Wednesday, October 31, 2007

Happy Harvest


Today's Sketch Challenge is a great one -- it's a simple layout that has many possibilities! To make the card base, I folded a 7x5" piece of white card stock in half, then backed it with a larger piece of Always Artichoke cardstock. For the panels on the card front, I used paper from Karen Foster Designs and Susan Branch. I crimped a piece of Always Artichoke to divide the panels. The image and sentiment are from Gina K. Designs. This stamp is one of my favorites! Going to the pumpkin patch is something I love to do with my family every fall, and this image reminds me of those times together. I stamped it with Stazon Timber Brown, then watercolored it with my aquapainter and inks -- More Mustard, Pumpkin Pie, and Always Artichoke. I used Creamy Caramel ink on the ground and to highlight around the image. I sponged around the pumpkins with Soft Sky ink and sponged the edges of the panel with Pumpkin Pie. To embellish, I machine stitched around the cardfront with white thread, then I added a Prima Silk Road flower and some natural hemp twine. I mounted the image panel on dimensionals.

I'll be back tomorrow with my first sneak peek at the new C.C. Designs stamps! See you then! :)

Tuesday, October 30, 2007

Halloween Treat Tins


I just wanted to share these Halloween tins with you. I made these for Anna to give to her Kindergarten teacher and aides. They came together in a snap, thanks to the tins and Spooky Sweets stamp set, both from Papertrey Ink. I simply cut strips of SU! Creepy Crawly paper and used Sticky Strip to attach them to the tins. I added some ribbon to the top (Martha Stewart and Michael's) and attached the sentiment circles to the front. The Hershey's Nuggets are wrapped with address labels which were stamped in Pumpkin Pie and Really Rust. Quick and easy!

Happy Halloween to all of you -- I hope you receive more treats than tricks! :)

Snowtacular Color Challenge!


Today's Color Challenge at SCS was just that -- a challenge! The colors (So Saffron, Tempting Turquoise, and Real Red) are colors I never would have put together otherwise, but thanks to some SU! paper, I made it work! The red paper is from a SU! Simply Scrappin' Kit, and the Turquoise paper is Petals & Paisleys double sided paper. All images are from the set Reindeer Games by C.C. Designs. You can find it at All That Scraps. This card is 5 1/4" square. Most of it is self-explanatory. I watercolored the deer with an aquapainter and ink pad lids. I did add some machine stitching in a few places, and the swirl is stamped in white craft ink and heat embossed with white detail embossing powder. The supplies are listed below.

I'll be back later with some little Halloween treats! One more day 'til Halloween! :)

Stamps: Reindeer Games (C.C. Designs) Cardstock: So Saffron, Tempting Turquoise (SU!); Coconut Smoothies (Bazzill) Paper: SU! Ink: Brilliance Graphite Black; White Craft, Tempting Turquoise, So Saffron, Real Red, Close to Cocoa, Creamy Caramel (SU!) Other: aquapainter, white detail EP, heat tool, 1/8" handheld punch, red grosgrain ribbon, stampin' dimensionals (SU!); white gel pen (Marvy), snowflake eyelet, sewing machine & white thread

Monday, October 29, 2007

Technique Challenge: Cracked Glass


Today's Technique Challenge at Splitcoaststampers is Cracked Glass. Beate's tutorial can be found on the Challenge thread here. To do this technique, you heat emboss over your stamped image with three layers of Glassy Glaze EP or other thick embossing enamel. You put your embossed image in the freezer for a minute or so to cool completely, then you bend it to crack the glaze. So cool!

The image and sentiment on this card are part of the Believe set from Papertrey Ink. I stamped the tree in SU! Old Olive ink, then used a blender pen and inks (Old Olive, Always Artichoke, Close to Cocoa and Cranberry Crisp) to color it in. The sentiment is stamped in Cranberry Crisp ink. Paper is from K&Co., and the cardstock is SU! River Rock, Cranberry Crisp, and Very Vanilla. It's hard to see, but I stamped En Francais in River Rock ink on the background paper. Another detail that's hard to see: I scored a "frame" around the tree image before doing the heat embossing. After the glaze was cracked, I sponged River Rock ink onto it to define the cracks a little better.

I love the aged, vintage look that this technique gives to an image. If you haven't done cracked glass, give it a try -- you'll be glad you did! I'll have one final Halloween project to share with you tomorrow, so I hope you'll stop back to visit ! :)

Stamps: Believe (Papertrey Ink), En Francais (SU!) Cardstock: Cranberry Crisp, River Rock, Very Vanilla (SU!) Paper: K&Co. Ink: Old Olive, Cranberry Crisp, River Rock, Always Artichoke, Close to Cocoa (SU!) Other: Glassy Glaze EP, heat tool, Vintage Brads, Cranberry Crisp stitched grosgrain, blender pen, stamping sponge, lg oval punch, stampin' dimensionals (all SU!)

Saturday, October 27, 2007

Inkadinkado Trio


Hi, everyone!

Did you know that Jacksonbelle is having an Inkadinkado Card Contest? The winner gets to be her Guest Designer for the month of December. How cool would that be?!? Here's a trio of cards I designed for the contest.On the first card I used Cappuccino, on the second I used Rooster (I've had this stamp forever!), and the third features Ring and Wine and Cheese. Check out Lindsey's inventory over at her store. Have you entered her contest? It's open through next week -- what are you waiting for? :)


On another note, I received the new Christmas sets from C.C. Designs -- they're way too cute!! They will be available at All That Scraps on November 7th. I can't show you my samples until November 1st -- but I promise they'll be worth the wait!! ;)

Thanks so much for visiting -- have a great weekend !!

Friday, October 26, 2007

Making Memories Sweets -- They're Sweet!

Have you seen Sweets from Making Memories? They are glossy, two-sided, dimensional flower embellishments, and they ARE sweet! When my 13-year-old daughter saw them she said, "Those are cool!" -- definitely a stamp of approval! :) There are two types available at All That Scraps: Polo and Black & White. I'd like to share a few cards I made using the Polo Sweets. The colors are bright and fun -- definitely eye-candy!

On this first card, I used the smallest size of Sweets. I added a row of three, much the same way I would use brads. They were easily attached with glue dots.

Stamps: Daphne Goes to School (C.C. Designs) Cardstock: Pretty in Pink, Tempting Turquoise (SU!); Coconut Smoothies (Bazzill) Paper: Petals & Paisley (SU!) Ink: Basic Black, Pretty in Pink, Tempting Turquoise, Old Olive, So Saffron, Close to Cocoa, Blush Blossom (SU!) Other: Polo Sweets (Making Memories), pink dotted ribbon (May Arts), aquapainter, Scalloped Circle Punch & 1 3/8" circle punch (SU!), white gel pen (Marvy), paper piercing tool, sponge, dimensionals, glue dots

For Tubby Time, I used a large flower as an accent. This particular one did not have a hole in the center, but I wanted to insert a Bazzill white brad. I used a 1/8" handheld punch to make the hole. The punch easily went through the flower -- problem solved!

Stamps: Bitzy Bugz Tubby Time (C.C. Designs); Warm Words, Polka Dots & Paisley (SU!) Cardstock: Barely Banana, Certainly Celery (SU!); Coconut Smoothies (Bazzill) Ink: Basic Black, Barely Banana, Certainly Celery, White Craft (SU!); Brilliance Graphite Black Other: Polo Sweets (Making Memories), white brad (Bazzill), Liquid Applique, Dazzling Diamonds glitter (SU!), heat tool, white gel pen (Marvy), sponge, dimensionals, 1/8" handheld punch


For the third card, I tied the flower to the panel with ribbon, just like a charm. A quick and easy embellishment!

Stamps: Bitzy Bugz Dress Up (C.C. Designs) Cardstock: Certainly Celery, Almost Amethyst (SU!); Coconut Smoothies (Bazzill) Ink: Basic Black, Certainly Celery, Pretty in Pink, Almost Amethyst, White Craft (SU!) Other: Polo Sweets (Making Memories), white organdy ribbon, Liquid Pearls, Stardust pen (Sakura), aquapainter, Cuttlebug & Bloom Dots embossing folder (ProvoCraft)

I found Sweets to be very easy to use, and they add a fun, colorful element to any project!

Thursday, October 25, 2007

I've Been Tagged!!

I've been tagged by Dawn Easton and Lindsey Botkin, so it looks like it's my turn! :)

Instructions:
1. Link to the person that tagged you and post the rules on your blog.
2. Share 7 random and/or weird facts about yourself (on your blog, we all want to know them).
3. Tag 7 random people at the end of your post and include links to their blogs.
4. Let each person know that they’ve been tagged by leaving a comment on their blog

Here are 7 facts about me:
1. I am the oldest of three children -- I have two younger brothers.
2. My name is Christina and my husband's name is Christopher -- we're Chris and Chris!
3. During college I did data entry at a brewery in Cincinnati -- I took home free product once a month, which made me very popular with my friends!
4. I sang in a band when I was 18 -- I was too young to get into the bars in which I was singing!
5. I graduated from Xavier University with a double major -- Elementary Education and Special Education.
6. I parasailed once in the Bahamas -- NEVER AGAIN!!!!!!!
7. I had my first baby naturally with no epidural. It is important to note that this was NOT by choice -- he came too fast and there was not enough time!!

So, now you know a little bit more about me! I know I'm supposed to tag 7 people, but I think most of my blogging friends have already been tagged, so I'll throw it out there to all of you! Feel free to list 7 facts about yourself on your blog, and link back to me! TAG, you're it!! :)

Wednesday, October 24, 2007

Reindeer Trio


I *love* this stamp -- Dasher, Dancer & Prancer -- from Gina K. Designs. It just makes me smile! It was the perfect size to use for today's Sketch Challenge. I also used Gina K.'s Christmas Ball and Peace. The background swirls are from SU!'s Baroque Motifs. The image and sentiment were stamped in Basic Brown ink. I watercolored the reindeer and their antlers with Creamy Caramel ink and an Aquapainter. I used markers to ink up the ornament and stamped one on each side. I traced around the image and covered the ornament with a Sakura Glaze Gloss Clear Pen. It gives dimension and shine without heat embossing! I did some sponging and machine stitching and added ribbon and brads. One more Christmas card completed! :)

Thanks for coming by -- I hope to have more to share tomorrow!

Stamps: Gina K. Designs, Baroque Motifs (SU!) Cardstock: Old Olive, Bravo Burgundy, Crafters Select White (Papertrey Ink) Paper: Perhaps (BasicGrey) Ink: Old Olive, Basic Brown, Creamy Caramel Other: markers (Old Olive, Bravo Burgundy, Close to Cocoa), Glaze Pen, Vintage Brads, burgundy grosgrain ribbon, white organdy ribbon, Round Tab Punch, sewing machine & white thread, stamping sponge

Tuesday, October 23, 2007

A Wintery Color Challenge Card


Today's Color Challenge colors(Purely Pomegranate, Soft Sky, and Basic Gray) just begged to be used on a winter card! I didn't have Basic Gray, so I substituted Going Gray instead. The images were stamped in Basic Black ink and colored with a blender pen and ink. I shmooshed (is that a word?) the ink pad and lid together then picked up the color from the puddle it created. I used a simple layout, so I tried to give the card as much personality as I could! I added glitter glue to the image borders and the Cuttlebug background, I used Liquid Applique for the snow, and I faux stitched around the center panel. I found the snowflake eyelets in my stash -- they were exactly what I needed!

The temperature here finally took a nose dive from the 90's and 80's (it's now near 50 degrees), and we've had four inches of rain in the last 48 hours! The gray weather and these snowmen have me thinking about a warm blanket and a hot cup of tea!! I think that's where I'm headed -- have a great night! :)

Stamps: Festive Favorites, Straight Up Alphabet Cardstock: Purely Pomegranate, Soft Sky, Going Gray, Stampers Select White (Papertrey Ink) Ink: Basic Black, Purely Pomegranate, Soft Sky, Going Gray Other: Cuttlebug & Snowflakes embossing folder (ProvoCraft), Blender Pen, Liquid Applique, glitter glue (Sulyn Industries), white eyelet (Bazzill), snowflake eyelets, Purely Pomegranate stitched grosgrain, silver cord, white gel pen (Marvy), Stampin' Dimensionals

Monday, October 22, 2007

Featured Stamper: TruCarMa


Hello!

I'm sorry I've been a slacker for a few days. I had the best of intentions to do some serious stamping over the weekend, but Thursday afternoon some kind of "stomach bug" got me. Without giving you the details, I'll just say it took the energy right out of me!! ;) Anyway, I'm feeling more like myself today, so I thought I'd catch up on some card making. I checked out the Featured Stamper Challenge at SCS and was thrilled to see that this week's Featured Stamper is TruCarMa! She's a fantastic stamper and is super-sweet, too!! And, she's a celebrity -- she's going to be on Who Wants to Be a Millionaire this week, October 23 & 24!

I chose this card to CASE. It's a card that can so easily be changed to suit any occasion! I used the same layout and stamp set (Office Accoutrement), but I changed the color scheme, background stamp, and embellishments. It's pretty straightforward, so I'll just list the supplies for you. Check out Carole's blog and her gallery for some inspiration -- you won't be disappointed! Have a great day! :)

Stamps: Office Accoutrement, It's Your Birthday (both SU!), Studio g clear stamp from Michaels Cardstock: Crafter's Select White (Papertrey Ink), Summer Sun (SU!) Paper: Oh Baby! Boy (BasicGrey) Ink: Old Olive, More Mustard & Not Quite Navy (SU!) Other: Silk Road flowers (Prima), white brads (Bazzill), Old Olive grosgrain ribbon (SU!), glue dots, dimensionals, stamping sponge, Spiral Punch (SU!)

Thursday, October 18, 2007

Back to My Roots!


I've been neglecting my Stampin' Up! stamps lately. SU! was the reason I fell in love with stamping, and the stamps and products are still among my favorites, so I decided that my Sketch Challenge card would be made with only SU! supplies (well, except the Cuttlebug and sewing machine). I'll just point out a few things I did, and I'll list the supplies at the end of the post. For the background, I lightly inked parts of En Francais with Chocolate Chip ink and stamped it on the Brocade Background paper. I then machine stitched a border with brown thread. The horizontal panel was embossed with a Cuttlebug and Textile Texture embossing folder, then I sponged Chocolate Chip over it to make the embossing pop. There is also sponging around the dp and the vanilla panels. For the focal image, I stamped one of the images twice with River Rock ink. The center image was stamped in Chocolate Chip Craft ink and heat embossed with Iridescent Ice Embossing Powder. I looooove how it looks -- I'll definitely be doing that again!

Thank you so much for stopping by to visit. I noticed that my hit counter has passed 10,000 hits! I never thought that would happen, much less in just three months! I was hesitant to start this blog, but I'm so glad I did -- I have learned so much and have made many new friends! Thank you all for your kind words and encouragement -- it has really helped me more than you know! :)

I hope you have a great day -- the weekend's almost here! :)

Stamps: Garden Silhouettes, Warm Words, En Francais Cardstock: Old Olive, Chocolate Chip, Very Vanilla Paper: Brocade Background dsp Ink: Chocolate Chip, River Rock, Chocolate Chip Craft Other: 1 1/4" & 1 3/8" circle punches, lg oval punch, Choc Chip Taffeta Ribbon, Vintage Brads, Iridescent Ice EP, Heat Tool, Cuttlebug & Textile Textures folder, sewing machine & brown thread, Stamping Sponges, Stampin' Dimensionals

Tuesday, October 16, 2007

Treat Slider

With Halloween being only 15 days away, I've started to think about treats for my two youngest girls' classmates. I'm trying to come up with some "non-candy" treats -- I know the parents will appreciate it, even if the kids don't! ;)

Yesterday's Technique Challenge at SCS provided the perfect opportunity to try something new -- a Treat Slider. I've seen these so many times and never made one. Now that I have, I don't know why I waited so long! They're sooooo easy! I did mine for a popcorn bag, but you can easily adapt the size to fit a candy bar or other treat. All the directions are on the challenge thread HERE. When you pull the knot on the ribbon, the popcorn bag slides out. Pretty cool! All ribbon is from Martha Stewart and was purchased at Michaels.


For the wrapping, I used Bazzill Coconut Smoothies cardstock, Stampin' Up! Pumpkin Pie and Basic Black cardstock, and SU! Creepy Crawly paper. I used my Halloween Set from C.C. Designs (available at All That Scraps) to embellish the wrapping. I stamped the spider, the sentiment and the bat in SU! Basic Black ink. I colored the bat with a black Prismacolor Pencil blended with odorless mineral spirits, then I cut him out. You can't see it well in the photo, but I gave him a little shime with a Sakura clear glaze pen. I then used black and white Marvy gel pens to highlight his eyes, ears and fangs. I used the Marvy Mega Circle Punch and Giga Scalloped Circle punch for the sentiment. I added dots with the white gel pen and faux stitching with a SU! Pumpkin Pie marker. I just attached the circle to the wrapping and mounted the bat on a SU! Stampin' Dimensional, and the slider was complete!

Do you have any other ideas for "non-candy" Halloween treats? If so, I'd love to hear them! Thanks for coming by to visit -- I'm so glad you did! :)

Monday, October 15, 2007

Norris Lake Photos and a Card to Share

Hi!

I have a card to share, but first I wanted to show you some photos of our trip to Norris Lake in Tennessee (click on any of the photos for a better look). The house belongs to a family we know -- our daughters go to school together. We went with Chris's sister, her husband, and their two children. It was a little too cold to rent a boat, but we spent some time at Norris Dam and the State Park. We also just had time to "hang out" in the house, playing cards and ping-pong and enjoying the beautiful view. The guys did get to play golf Friday, and I actually was able to read a book! It was a much-needed weekend away! :)

There were deer everywhere -- I couldn't get my camera out fast enough most of the time, since they just ran across the road or through the yard without warning! We did get a shot of one in the road as we were arriving Thursday.


Here's the view from the back of the house. Notice how low the lake is -- the lack of rain this summer really affected the water level!


Since the back of the house is west-facing we saw beautiful sunsets, too.


These next two photos are taken at the Norris Dam Marina. You can see here how low the water is -- you can barely see it coming up into this area next to the parking lot. Normally, the water would come up almost level with the lot.


The "No Fishing" sign looked a little out of place in front of the dry bed -- I thought it made a funny picture!!


Even though we had a great weekend, I was missing my stamps and all of you! :) I was eager to get back to work! I'm trying to play catch-up with some challenges, so I created this card with a couple in mind. I used Jen del Muro's "Sketch For You To Try" and the SCS Ways to Use It Challenge -- using bling!
I love this C.C. Designs Bitzy Bugz Cutie Patootie image -- I thought she'd be perfect for one of the many baby girl cards I need to make! The card base is Bazzill Canvas Texture and the patterned paper is Sassafras Lass Blue Boutique - Delightful. They can be found at All That Scraps. The SU! Green Galore cardstock was dry embossed with my Cuttlebug and the Bloom Dots embossing folder. The image and sentiment (from SU! So Very) were stamped on Bazzill Coconut Smoothies cardstock with SU! Basic Black ink. I colored her and added her shadow with SU! Green Galore ink and an aquapainter. I paper pieced her dress with the patterned paper and added stitches with a Green Galore marker. I also used the marker to put some doodles in the corners. I punched out the sentiment with a SU! Round Tab Punch, pierced under the sentiment, and sponged around the tab and panel with SU! Regal Rose ink. The ribbon is May Arts sheer white dots on pink, and the flower is a Bazzill Bitty Blossom. The "bling" came from a couple of rhinestones from my stash, manufacturer unknown. I think this one turned out pretty cute -- now to decide which baby girl receives it! :)

Thanks for taking the time to look at this lengthy post -- I'll be back with more for you tomorrow! :)

Sunday, October 14, 2007

Back from Fall Break... and Exciting News!!

Hi, everyone! We just returned from our weekend at Norris Lake. It was a beautiful Fall weekend! Although we didn't go boating, we went to Norris Dam and spent time at the State Park. I'll share photos later!

I was catching up on emails and my daily dose of blogs, and I found out I was one of the designer picks in the CPS/CardMaker contest! See HERE for the list of winners! The grand prize winner has yet to be named -- I'm still keeping my fingers crossed! :)

I'll have more on our trip and some more stamping later -- I just wanted to share my news! I hope you are having a great weekend and enjoying some beautiful autumn weather! :)

ETA: The Grand Prize Winner was announced -- it's Crystal Brown. Congrats, Crystal! :)

Wednesday, October 10, 2007

A Ghostly Hello


I am having so much fun with my C.C. Designs stamps!!! I realized I hadn't used Boo yet, and it was a perfect image for today's Sketch Challenge at Splitcoaststampers. I started with Papertrey Ink's Stamper's Select White Cardstock. It's very sturdy, perfect for those times when you want a white card base. To follow the sketch, I cut 1" off the front, then I sponged around all the edges with SU! Pumpkin Pie ink. Then I layered the remaining area on the front with SU! Basic Black cardstock and Creepy Crawly paper. The sentiment, from the C.C. Designs Halloween sets, was stamped in Basic black ink along the back edge of the card.

For the image panel, I stamped Boo in Basic Black ink on the white cardstock. I gave him a highlight/shadow using a blender pen and SU! Creamy Caramel ink. I rounded two of the corners with the SU! Corner Rounder, sponged the edges with Pumpkin Pie ink, and added dots to the rounded corners with a Marvy black gel pen. I gave Boo's eyes a little sparkle with a Sakura Stardust Gelly Roll pen. He's holding a jack-o-lantern jingle bell (Westrim Crafts) that I attached with a Bazzill white brad. On the bottom corner, I threaded some Michael's ribbon through a Bazzill white eyelet, then secured it with SU! black hemp twine. I mounted the panel to the card front with SU! Stampin' Dimensionals.

Boo, sentiment, Bazzill brad & eyelet, and Stardust Gelly Roll pen can be found at All That Scraps.

From tomorrow through Monday, the kids are off school for Fall Break. We're actually taking a few days and going to Norris Lake in Tennessee! It's supposed to be a beautiful fall weekend -- I can't wait! Hopefully I'll get to post some things while I'm gone -- if not, I'll see you Sunday or Monday! Thanks for visiting -- I really do appreciate it!!! :)

Monday, October 8, 2007

A Fun Gift Idea

Since I received the C.C. Designs set Reindeer Games from Christine at All That Scraps, I have been trying to think of fun ways to use those adorable reindeer images. I wanted to come up with something that was not strictly for Christmas. I absolutely *love* Cheer Deer, and I thought she'd be great on a hostess or a birthday gift -- after all, she DOES like a party! Sooooo, as the wheels in my head were turning and I spotted my new candle on the table...


THIS is what I decided to do! The Pocket Full of Posies glitter paper from DCWV was a perfect choice for the wrapping --it is sparkly and has some wintery colors (plus a little bit of orange to match my pumpkin candle!). I paired it with SU! Bashful Blue cardstock. The image was stamped on Bazzill Coconut Smoothie cardstock with SU! Close to Cocoa ink and colored with Prismacolor Pencils blended with odorless mineral spirits. I added a little sparkle and some bubbles to the drink with a Sakura Stardust Gelly Roll Pen. I punched a couple 1/8" holes and added grosgrain ribbon so I could give Cheer Deer a scarf. I lightly stamped a snowflake from the set around the edge of the panel and sponged with Bashful Blue ink, then matted it on Pumpkin Pie cardstock. White organdy ribbon is threaded through two holes on the sides of the image panel so it (and the sentiment) could be tied to the candle. The sentiment is stamped in Close to Cocoa ink, and Bashful Blue is sponged around the edges.


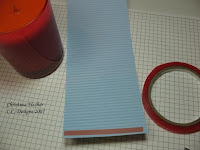
Here's how I made the candle wrapping. Keep in mind that these measurements were for my candle, but you can adjust for your own needs. I cut a strip of blue cardstock 11 x 3 3/4". Note: you will need to cut the length a little longer than you really need, because it will shorten a bit when crimped (mine shortened to 10 3/4"). I ran the strip through my Fiskars Paper Crimper and set it aside.


I then cut a 10 3/4 x 3" strip of patterned paper. I wanted to be sure the crimped cs would be visible above and below the paper strip. I put Sticky Strip on all edges of the back side and adhered it to the crimped cardstock.


After the two strips were together, I put more sticky strip on the end, then rolled it tightly around the candle and secured it.


Here's the candle, all wrapped up! I added the image panel, sentiment and ribbon, and the gift was complete! This will be a perfect hostess gift for a holiday party, or it would be a great birthday gift, too! I hope this gives you some good ideas -- thanks for stopping by today! :)

Happy Monday!


Good morning, and happy Monday! I apologize for not posting this weekend. Chris was gone all weekend, and our schedule was packed every day. I won't bore you with all the details, but let's just say I spent more time in the car than I did at my stamping table! I didn't even get to do any stamping for World Card Making Day! UGH!

Here's a card I started Saturday, finished Sunday, and am posting today! It was going to be for a baby shower, but I decided it might be a fun "just because" card instead! Many of the supplies for this card can be found at All That Scraps. The card base is a Memory Box Granny Smith Notecard. I dry embossed it with my Cuttlebug and Spots & Dots embossing folder. The paper is from Doodlebug Designs. Matting is done on SU! Tempting Turquoise cardstock. I just *love* the Bitzy Bugz from C.C. Designs. This one is Umbrelli. I stamped the image on Bazzill Coconut Smoothie cardstock with SU! Basic Black ink, paper pieced the umbrella, and colored the rest with a blender pen and SU! Green Galore and Tempting Turquoise. The "raindrops" around the image are Splat Rain Dots from Cloud 9 Designs. The sentiment is from the Daphne/Donald Goes to School sets, also from C.C. Designs. I stamped it with Basic Black ink on Tempting Turquoise cardstock. I used a SU! word window punch to round off the end, then added a Bazzill white brad. I finished the card with Tempting Turquoise ribbon, and I mounted the image panel and sentiment on dimensionals.

I ususally don't use bright colors on my cards, but I really like this one! It's cheerful and happy! I hope I get a little more time to stamp today. Please stop back to visit -- have a great day! :)

Thursday, October 4, 2007

Halloween Treat Set


I always have an empty coffee can or two sitting around, so I decided to turn one into a Halloween treat can. I covered it with SU! Creepy Crawly paper, making a matching circle for the lid with my Fiskars Circle Cutter. I added ribbon from Michael's to the top and bottom, first running it through my Xyron Sticker Maker (the orange X) to make it sticky. I added a strip of paper (the opposite side pattern) around the middle of the can. You can see it in the side view photo (click on a photo to enlarge).


The images are from C.C. Designs. You can find them at All That Scraps. Bob Jack O' lantern, Fred Jack O'lantern, and the sentiment are all in the Halloween sets, and Bob & Jack are also sold separately. I stamped them on Bazzill Coconut Smoothie cardstock with SU! Basic Black ink. I masked Bob and stamped Fred once on each side. They were colored with Prismacolor Pencils and blended with odorless mineral spirits and blending stumps. I created a shadow under them with a SU! Creamy Caramel marker. I added piercing to the corners, matted it on SU! Pumpkin Pie cardstock, and added orange eyelets to the sides. I punched out the sentiment with a SU! scalloped circle punch, then sponged the edges with Pumpkin Pie ink. I tied Martha Stewart ribbon to the sides of the panel, tying the sentiment on as well. I attached the panel to the can with Sticky Strip. I stuck the sticky strip to the right and left sides about 1/2" in, so those edges would have a little dimension.


I made a matching gift card with SU! Pumpkin Pie and Basic Black cardstock. I added a Bazzill Bitty Blossom and a Bazzill white brad. This was a fun set to make -- now I just have to decide who will receive it! Thanks for stopping by today-- have a great night! :)

Wednesday, October 3, 2007

Christmas in July -- in October!


I made this card for the CPS/CardMaker Magazine card design contest. I had to use the sketch shown below and choose a theme: Patriotic, Travel Postcards, Summer Parties, or Christmas in July. The winners will be featured in the July 2008 issue of CardMaker magazine. The deadline is Saturday, October 6 -- go over to CPS and check it out!

This one took me a while -- I fussed and fussed over the layout and details, but I'm finally happy with the result! Obviously, I chose the Christmas in July theme -- I took it quite literally, because there are summer flowers in the background paper!! :) It's really a country Christmas in July card -- the sponging, distressing and faux stitching give it a shabby look that coordinates perfectly with the Daisy D's paper.

The small poinsettias are from the Season of Joy set (SU!), and the large poinsettia is a chunky foam stamp I have had in my cabinet for years!!! I think it's the first time it's seen ink! I stamped them in Ruby Red ink, cut them out, and sponged around and on them with Always Artichoke ink. I applied Always Artichoke ink directly to the chipboard, then I sanded the edges to distress them. I drew the faux stitches with an Always Artichoke marker. The sentiment is from Gina K. Designs. I used circle punches to create the tag then sponged around the sentiment.

Even if it isn't a winner, someone will get a lovely Christmas card from us this year!! :)

Thanks for visiting -- have a great day!

Stamps: Season of Joy (SU!), peace (Gina K. Designs), lg foam poinsettia Ink: Ruby Red, Always Artichoke Cardstock: Always Artichoke, Ruby Red Paper: French Market Swatches (Daisy D's) Other: On Board Accents chipboard, gold cord, 1 1/4" circle punch, 1 3/8" circle punch, 1/4" circle punch, 1/8" handheld punch, 1 1/4" square punch (all SU!), gold glitter glue, sage organdy ribbon, sanding block, sponge, dimensionals

Believe


Did you notice something different about my blog? It's PINK! I went pink for October, which is Breast Cancer Awareness Month. Fortunately, breast cancer has not affected my family directly, but we have several friends who are survivors.

I made this card in honor of all those who have been affected by breast cancer. I used Causabella from Stamping Bella. I paper pieced her dress and the pink ribbon, and I colored the rest of her with my Prismacolor Pencils. I replaced the flower on her dress with a mini paper flower and a rhinestone. I sponged around the panel and the small oval with So Saffron ink. I used a ticket corner punch and paper piercing tool on the corners, then I added brads and ribbon to finish it!

Girls, this is your reminder to get your mammograms! And go pink for October! :)

Stamps: Causabella (Stamping Bella), sentiment (Michael's $1 bin), Paisley bg (SU!) Ink: Basic Black, So Saffron Cardstock: Barely Banana, Regal Rose, Whisper White (SU!) Paper: Stella Ruby, Romani (BasicGrey) Other: ticket corner punch, oval punches, Rich Regals brads, Crafters Tool Kit, stamping sponge, stampin' dimensionals (all SU!); mini paper flower (Making Memories), sage organdy ribbon, rhinestone Techniques: paper piecing, sponging, piercing

Tuesday, October 2, 2007

Color Challenge: Chocolate Bayou

I just *love* the colors for today's Color Challenge at Splitcoaststampers: Chocolate Chip, Blue Bayou, and River Rock. They seemed perfect for an "earthy" card. There's a lot of distressing on this one! The leafy image and natural hemp add to the earthiness, too. Since there are so many elements on the card I wanted a subtle background, so I fingerwalked En Francais onto the Blue Bayou card base with Blue Bayou ink.

I think that's all I have for today -- I hope to have more to share tomorrow! :)

All supplies Stampin' Up!
Stamps: Stem Silhouettes, En Francais Cardstock: Blue Bayou, Chocolate Chip, Whisper White Paper: Brocade Backgrounds, Apple Cider Ink: Blue Bayou, Chocolate Chip, River Rock Other: antique gold hardware, Cutter Kit, Blue Bayou stitched grosgrain, natural hemp twine, stamping sponge, stampin' dimensionals, Crafters Tool Kit, Chocolate Chip Marker Techniques: distressing, faux stitching, sponging

Sweet & Simple Baby Card


Hello! I hope you are having a good week so far! I wanted to share a card I made for my cousin's baby shower. Here's the story behind it. Her husband, when they were dating, starting calling her "Sweet Pea." So, that theme popped up a few times during her wedding shower. Her sister (and Matron of Honor) gave her a shirt that has "Sweet Pea" on it, and she was wearing it in the photo they took for their Christmas card last year. Now, she's pregnant with twins! I couldn't help myself -- I reached for my Green Thumb set from Papertrey Ink, knowing this image and sentiment were in it. I re-inked just the "s" after stamping the sentiment, so I could turn "sweet pea" into "sweet peas." Ahhh, the joy of clear stamps! :)

I wanted to keep the card sweet and simple and let the images be the focal point. I hope that's what I achieved! I plan to have a color challenge card posted later today, so stop back! Have a great day!

Stamps: Green Thumb (Papertrey Ink) Cardstock: Almost Amethyst, Whisper White, Old Olive (SU!) Paper: Perhaps (BasicGrey) Ink: Old Olive, Certainly Celery, Basic Black (SU!) Other: Photo Corners punch, Old Olive grosgrain, Ice Circles brads, stampin dimensionals, stamping sponges (all SU!), glitter glue (Sulyn Industries)